Recipe: Raspberry Coconut Opera Cake

Alternate plating idea for the opera cake

Makes: 20 slices, halve recipe to make less

Time required: 3 hours + extra time to decorate

Difficulty: ★★★☆☆

Inspiration:

Having recently watched the Zumbo Just Desserts tv show, I was inspired by some of the challenges the contestants faced … in particular the Franken-dessert and the Aussie Classics challenges. This is where the “Operington” cake comes in – the elements of an Opera Cake meet the flavours of a Lamington. I always enjoy making opera cakes because there’s so many layers and elements – which also allows for more creativity with flavours and textures

Elements for this cake:

  • almond coconut sponge
  • raspberry buttercream
  • raspberry jam
  • chocolate ganache
  • raspberry soju jelly, for plating
  • chocolate sauce, coconut and fresh raspberries, for plating

Ingredients:

Almond coconut sponge:

  • 9 egg whites
  • 100g caster sugar
  • 300g almond meal
  • 100g desiccated coconut
  • 400g icing sugar
  • 2tsp vanilla extract
  • 100g plain flour
  • 9 eggs
  • 100g melted butter

raspberry buttercream:

  • 200g raspberries
  • 400g butter
  • 200ml thickened cream
  • 200g caster sugar
  • 9 egg yolks

raspberry jam:

  • 200g raspberries
  • 150g sugar
  • 2 gelatin leaf

chocolate ganache:

  • 500g dark chocolate
  • 400ml thickened cream
  • 40g butter

raspberry soju jelly (optional for decorating):

  • 125g raspberries
  • 1 cup water
  • 1 cup soju (or other alcohol)
  • 8 sheet gelatin

Instructions:

Almond coconut sponge:

  1. preheat oven to 200C
  2. whisk egg whites with caster sugar until stiff peaks and set aside
  3. in a separate bowl, whisk together the almond meal, icing sugar and desiccated coconut
  4. add the eggs and vanilla and whisk until well combined
  5. sift in the flour and mix
  6. carefully fold in the egg whites
  7. gently fold in the butter, careful not to remove all the air in the batter
  8. spread evenly over four trays (roughly 15x30cm) lined with baking paper
  9. bake for 8 minutes until just cooked
  10. remove from baking sheet and set aside to cool

raspberry buttercream:

  1. puree raspberries and place in a pot over low heat until the sugar melts
  2. whisk the egg yolks with sugar until light and fluffy
  3. slowly pour in the hot raspberry while whisking the egg yolks to gently heat up the eggs without scrambling them
  4. return the entire raspberry/egg mixture to low head and continue to mix until it thickens
  5. in a separate bowl, beat the butter. Gradually add the raspberry/egg mixture and cream alternating while whisking until well combined

raspberry jam:

  1. puree the raspberries
  2. place the raspberries and sugar over low-med heat until just boiling
  3. add in the bloomed gelatin and set aside to cool

chocolate ganache:

  1. heat cream over med heat until just boiling
  2. pour over the chocolate and let sit for 2 minutes
  3. stir the cream/chocolate until well combined then mix i the butter

raspberry soju jelly:

  1. puree the raspberries
  2. place the raspberries, water and soju over medium heat until boiling
  3. add in the bloomed gelatin
  4. pour into a container (depending what shape you’d like the jelly) and leave in the fridge to set (at least 3 hours)
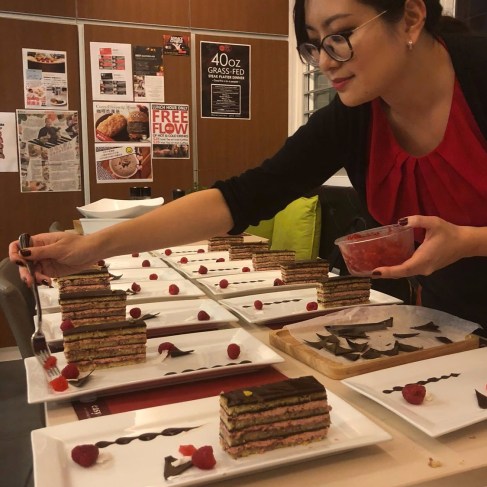
To assemble:

  1. place one slice/tray of the cake on a cake board or plate
  2. spread over 1/3 of the raspberry jam
  3. spread 1/3 of the raspberry buttercream then place in the fridge/freezer for 10mins to slightly harden
  4. spread over 1/4 of the chocolate ganache
  5. cover with the next slide of cake then repeat steps 2-4 another two times
  6. when all the cake/buttercream/jam layers have been used up, pour the remaining chocolate ganache over the top layer of cake
  7. leave in freezer overnight to harden before slicing the cake with a hot knife … freezing the cake results in cleaner edges when slicing the cake
  8. defrost the slices in the fridge for at least 2 hours before serving
Finished putting together all the layers of the opera cake
Plating the opera cake for a dinner party
another plating option for the raspberry opera cake
plating the raspberry opera cake (2)
close up of the Opera Cake for Instagram
Alternate plating idea for the opera cake


Instagram: Whatever_It_Bakes

Recipe: Lime Coconut Mousse

Nutting to see here - loving my squirrel bookend

Makes: 1 dome/half-sphere (~8inch in diameter)

Time required: 3 hours in total over 4 sessions

Difficulty: ★★★☆☆

Inspiration:

Reading through Olivier Dupon’s book “The New Patissiers” (my current favourite book) I came across one page which had a really interesting flavour combination – it was a recipe for a chocolate mousse entremet with a lime panna cotta, coconut dacqouise … coated in milk chocolate mousse. I wanted to give the elements of this recipe a try, liking the idea of the tangy-ness of the lime mixed with creaminess of the coconut and the sweetness of the chocolate.

Elements of this cake from centre to outside:

  • lime panna cotta
  • coconut cream
  • dark chocolate mousse
  • coconut dacquoise base
  • coated in dark chocolate velvet spray

Although every element of this cake is very easy and quick to make, it does require preparation to make and freeze each of the layers before moving onto the next

Ingredients:

Lime panna cotta:

  • juice of 2 limes
  • 90ml milk
  • 90ml cream
  • 45g caster sugar
  • 2 gelatin sheets

Coconut mousse:

  • 100ml coconut milk
  • 150ml milk
  • 150ml cream, whipped
  • 1 sheet gelatin

Coconut Dacqouise:

  • 3 egg whites
  • 60g caster sugar
  • 30g coconut flakes
  • 30g almond meal
  • 60g pure icing sugar

Dark Chocolate Mousse:

  • 94g caster sugar
  • 94ml water
  • 1 egg
  • 3 egg yolks
  • 150ml cream
  • 3 gelatin sheets
  • 250g dark chocolate
  • 300ml cream, whipped

Chocolate Velvet spray (I used a pre-made can)

Lime coconut mousse cake 4
Plastic moulds I used to create the dome shape

Instructions:

Lime Panna Cotta:

  1. bring lime, cream and sugar to simmer for 10 minutes
  2. remove from heat and mix in gelatin
  3. pour into dome mould (~3inch in diameter) and freeze for several hours or overnight

Coconut Mousse:

  1. bring coconut milk and milk to simmer
  2. remove from heat and stir in the gelatin
  3. once cool, gently fold in the whipped cream
  4.  pour into a dome mould (~3.5inch in diameter) and then push the lime panna cotta dome into the centre
  5. place into the freezer for several hours or overnight

Coconut Dacquoise:

  1. preheat oven to 180C and line a 8inch baking tin with baking paper
  2. sift together coconut flakes, almond meal and icing sugar
  3. in a separate bowl, whisk the egg whites and caster sugar to firm peaks
  4. gently fold the dry ingredients into the meringue
  5. spread onto baking tin and bake for 15-20mins

Dark Chocolate Mousse:

  1. whisk water, sugar, eggs and egg yolks together in a bain-marie
  2. remove form heat and continue to whisk until airy
  3. in a separate pot, bring cream (150ml portion) to boil and stir in the gelatin
  4. pour hot cream over chocolate and stir to combine
  5. gently fold the chocolate mixture into the egg mixture
  6. whisk the 300ml portion of cream, then gently fold into the chocolate/egg mixture
  7. pour the mousse into the 8inch dome to around two-thirds full and drop the panna cotta/coconut mousse into the centre
  8. fill the rest of the dome to almost to top, leaving a little space to place the coconut dacquoise on top
  9. place in freezer for several hours or overnight until the dome is frozen

Chocolate velvet coating:

  1. once the dome is frozen, unmould and coat the cake in a chocolate velvet spray
chocolate mousse dome
Lime coconut mousse cake 2
pre-made chocolate velvet spray
All finished and ready to eat
Lime coconut mousse cake
Nutting to see here – loving my squirrel bookend


Instagram: Whatever_It_Bakes

Christmas Baking: Croquembouche

Christmas Croquembouche

Having completed my practice croquembouche in Hong Kong several weeks ago, it was time to bake another croquembouche for family Christmas dinner. See earlier post for the full recipe and croquembouche made in Hong Kong.

For this croquembouche for Christmas day, I made several adjustments to the decorations – instead of randomly scattered profiteroles coated in coconut and crushed peanuts, this one contains layers of coconut and plain profiteroles.

My practice croquembouche also didn’t have any spun caramel as I wanted to keep the tower relatively neat. However, after several complaints about it not being a ‘real’ croquembouche without the spun caramel, I did manage to drape some caramel neatly around the profiterole tower. This caramel later melted due to the 35degree heat in Melbourne on Christmas day 😦

Overall, the family was very happy with Christmas dessert – from admiring the tower during dinner to eating the 80 leftover profiteroles several days after Christmas. The only bad feedback was from my sister-in-law who wasn’t too happy that I took the tower apart.

Now, to decide what to bake for Christmas next year …

Instagram: Whatever_It_Bakes

Recipe: Christmas Croquembouche

Christmas croquembouche baking recipe

Makes: 80-100 profiteroles, serves 15 – 30 people

Time required: 3 hours for the choux pastry, another 2 hours for filling and assembly

Difficulty: ★★★★☆ … Moderate to Difficult. Each step is relatively simple, however it takes time and patience to bring the whole thing together

Challenge:

After baking four cakes for Christmas dinner last year, I needed to bake something bigger and better for Christmas this year. However, an added challenge this year is that I am now living in Hong Kong and will only have one day to bake Christmas dessert once I arrive back home in Melbourne on Christmas Eve. This means I need something that can be baked in less than one day, can feed a family of 9 and also satisfies the requests I usually get from family: coffee, coconut, sweet, not too sweet … and of course it needs to have a touch of Christmas.

Enter croquembouche: makes ~80-100 profiteroles and can feed 15-30 people, it can be decorated to resemble a Christmas tree and you can make a range of fillings to meet every request … AND they look SPECTACULAR.

Inspiration:

I first saw croquembouche as an Adriano Zumbo challenge on Masterchef Australia several years ago. Touted as a very difficult challenge on Masterchef, I never even thought about making a croquembouche until several weeks ago when I was desperately thinking up Christmas ideas.

Having never baked profiteroles before, I read several blogs, watched a range of youtube videos and viewed countless Instagram photos in search of inspiration for decorating to make it fit the Christmas theme.

I decided to use my eclair recipe for the choux pastry. As for decorating, I went for a ‘cleaner’ croquembouche without the caramel strings and added pops of texture by coating some profiteroles in coconut or crushed peanuts. I also found some lovely ribbon at the Eslite Bookstore in Hong Kong to top off the croquembouche.

This post details my ‘practice’ croquembouche … I will be making the real one on Christmas Eve and will upload an update post-Christmas 🙂

Ingredients:

Choux Pastry (makes ~100 profiteroles):

  • 310g bread flour, sifted
  • 250ml water
  • 250ml milk
  • 250g butter
  • 30g caster sugar
  • 8-10 eggs
  • 2tsp salt

Custard filling:

  • 950ml milk
  • 8 egg yolks
  • 120g caster sugar
  • 80g corn starch
  • 30g unsalted butter
  • 2tsp vanilla bean paste

For decorating:

  • 500g sugar to assemble the croquembouche
  • 200g crushed peanuts
  • 100g shredded coconut

Note: you could also use sugar crystals, pearls or anything else you would like to decorate the individual profiteroles

Instructions:

Choux pastry:

  1. Preheat oven to 200°C
  2. Place the water, milk, butter, sugar and salt into a saucepan over low heat
  3. Once the mixture just comes to a boil, take off the heat, pour in all the flour and mix thoroughly with a wooden spoon (it should now look like mashed potato)
  4. Place the mixture back on low heat and continue to mix for another 2-3mins until the dough forms a ball and comes away from the sides of the pan
  5. Pour the dough into a bowl and mix with wooden spoon to cool slightly before adding the eggs
  6. Add the eggs one at a time and ensure each egg is well incorporated before adding the next egg. This allows greater control over the amount of egg to ensure the mixture doesn’t become too runny from too much egg
  7. The mixture is ready when you lift the wooden spoon and the dough slowly falls off the spoon
  8. Place dough into a piping bag fitted with a 1cm plain round nozzle and pipe balls around 2-2.5cm in diameter
  9. Dip a fork into water and slightly flatten the piped circles. The fork indents also reduce cracking in the oven
  10. Bake for 10mins at 200°C and then reduce the temperature to 180°C and bake for another 20mins

Custard filling:

  1. Whisk together egg yolks and sugar until pale
  2. Add in the cornstarch and whisk
  3. Place milk over low-med heat until it comes to a light boil
  4. Remove milk from heat and pour 1/3 of the milk into the egg mixture while continually whisking
  5. Pour the egg mixture into the remaining 2/3 of the milk and place back on low heat. Continue to whisk until the custard thickens
  6. Stir in butter and vanilla
  7. Transfer this to a bowl to cool – at this stage you could also break the custard into smaller batches and create several flavours by whisking in melted dark chocolate, fruit puree or coffee syrup
  8. Cover in glad wrap (with the glad wrap touching the surface of the custard) and refrigerate until it’s time to assemble the croquembouche.

Assembling the croquembouche:

  1. Transfer the custard into a piping bag fitted with a long piping tip and fill each profiterole with custard. Be sure to poke the piping tip through the side of the profiterole which will be facing the inside of the croquembouche
  2. Melt sugar over low heat until all the sugar is melted and is a light amber colour (you could also make a sugar syrup by adding water). Carefully dip the bottom of each profiterole and place the toffee side up on the tray to dry – at this stage I also coated around half of the profiteroles with either shredded coconut or crushed peanuts
  3.  Trace a circle template on a sheet of baking paper
  4. Construct the croquembouche by carefully lining the profiteroles around the circle; sticking each profiterole together using the toffee ‘glue’
img_3402
The finished product!!

Tips for serving:

  • The profiteroles can be cut away from the tower using a pair of scissors
  • I also pulled together a bowl of dark chocolate ganache (150g dark chocolate, 100ml cream) for guests to dip the profiteroles into while serving
img_3408
Cut the croquembouche with scissors


Instagram: Whatever_It_Bakes