Recipe: Mango Mousse Cheesecake Entremet

Mango mousse & vanilla cheesecake entremet on a crunchy caramel cookie

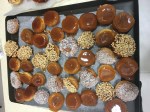
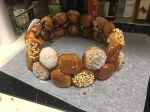
Makes: 12 mini dome cakes (6cm in diameter)

Time required: 3 hours in total, over 2 nights

Difficulty: ★★☆☆☆

Inspiration:

Inspired by another one of my favourite chocolates – the Mango & Vanilla chocolate from Koko Black back home in Melbourne. Every time I used to visit Koko Black I would buy at least five of these Mango & Vanilla chocolates in addition to several of the Passion flavour (I have also baked a cake inspired by this chocolate with recipe here!) and then try a range of other truffles and chocolates.

img_3460
Trying all the chocolates from Koko Black and Xocolatl in Melbourne

The elements of this cake include:

  • Vanilla cheesecake centre
  • Runny mango jam
  • Mango mousse dome
  • Mango mirror glaze
  • caramel biscuit base

Ingredients:

Vanilla Cheesecake centre:

  • 225g cream cheese
  • 200g caster sugar
  • 1 egg
  • 100ml thickened cream
  • 1 tsp vanilla
  • 1/2 lemon

Caramel Biscuit base:

  • 1 pack caramel flavoured biscuits (can use other flavours, e.g. Arnott’s Nice biscuits are a good alternative)
  • 150g melted butter

Mango jam:

  • 200g mango puree
  • 200g caster sugar
  • 2 gelatin leaves

Mango Mousse:

  • 200g mango puree
  • 250ml cream, whipped
  • 200g sugar
  • 3 gelatin leaves

Mango glaze:

  • 200g mango puree
  • 200g sugar
  • 4 gelatin leaves
  • 200ml condensed milk
  • 150g white chocolate

Instructions:

Vanilla Cheesecake centre:

  1. Preheat over at 150C
  2. beat the cream cheese with sugar until smooth
  3. whisk in the egg until well combined
  4. fold in cream, vanilla and lemon until just combined
  5. pour into a 8 x 8 inch square tin (or any other baking tin of similar size)
  6. bake for 20 minutes
  7. once cool, cut out 12 circles, around 2-3cm in diameter

Caramel Biscuit base:

  1. blend the biscuits in a food processor until there are not big lumps
  2. stir in melted butter
  3. spread over a large flat tin (ensure this is spread evenly enough to be able to cut out 12 x 6cm circles for the cake base) and bake at 150C for 10mins
  4. while still warm, cut out the 12 circles and set aside to cool. The 12 circles will be used as the base of the mousse dome, however do not discard the rest of the cookie base as this can be used to decorate the dome

Mango jam:

  1. heat mango puree and sugar over low heat until the sugar dissolves and the mixture thickens
  2. while the mixture is still hot, stir in bloomed gelatin and set aside
  3. once cool, place the mixture into a piping bag

Mango Mousse:

  1. heat mango puree and sugar over low heat until the sugar dissolves and the mixture thickens
  2. stir in gelatin and set aside to cool
  3. once the mixture is at room temperature, fold in the whipped cream to form the mousse

To Assemble:

  1. gather 12 circle dome moulds, each around 6cm in diameter
  2. fill half of each dome with the mango mousse mixture
  3. carefully pipe around 2 teaspoons of the mango jam on top of the mango mousse (be gentle as we don’t want to jam to sink to the bottom of the mould)
  4. push a piece of vanilla cheesecake into each of the domes on top of the mango jam. We want to push the cheesecake in just far enough that the edges of the cheesecake are surrounded by mango mousse. Add a bit more mousse into the dome if needed
  5. lastly, place a disc of the caramel biscuit onto each of the domes, sitting the biscuit base on top of the mousse
  6. set aside in the freeze for at least 3 hours, preferably overnight to harden

Glazing the cake:

Mango glaze: (make this the following day once the mousse domes are frozen)

  1. un-mould each of the mousse domes and place back in the freezer
  2. place mango and sugar over medium heat until the mixture thickens
  3. remove from heat and add the bloomed gelatin
  4. stir in the condensed milk
  5. while still hot, pour over white chocolate and stir to melt and incorporate the chocolate
  6. when the glaze cools to 35 degrees, pour over the mango mousse domes
  7. crumble the off-cuts from the caramel cookie base and coat around the base of each of the cakes
Mango mousse & vanilla cheesecake entremet on a crunchy caramel cookie


Instagram: Whatever_It_Bakes

Christmas Baking: Croquembouche

Christmas Croquembouche

Having completed my practice croquembouche in Hong Kong several weeks ago, it was time to bake another croquembouche for family Christmas dinner. See earlier post for the full recipe and croquembouche made in Hong Kong.

For this croquembouche for Christmas day, I made several adjustments to the decorations – instead of randomly scattered profiteroles coated in coconut and crushed peanuts, this one contains layers of coconut and plain profiteroles.

My practice croquembouche also didn’t have any spun caramel as I wanted to keep the tower relatively neat. However, after several complaints about it not being a ‘real’ croquembouche without the spun caramel, I did manage to drape some caramel neatly around the profiterole tower. This caramel later melted due to the 35degree heat in Melbourne on Christmas day 😦

Overall, the family was very happy with Christmas dessert – from admiring the tower during dinner to eating the 80 leftover profiteroles several days after Christmas. The only bad feedback was from my sister-in-law who wasn’t too happy that I took the tower apart.

Now, to decide what to bake for Christmas next year …

Instagram: Whatever_It_Bakes

Recipe: Teddy bear macarons

Teddy bear macarons recipe

Makes: 50 macarons

Time required: 3 hours

Difficulty: ★★★☆☆

Challenge:

When I was asked to bake macarons for a baby shower, my first question was “boy or girl?” I was trying to figure out if I should make blue blueberry macarons or raspberry red macarons … however turns out the sex of this baby was a surprise so I had to come up with something gender neutral. This is where the brown teddy bear macarons come in!

Ingredients:

Macaron shells:

  • 4 egg whites
  • 180g caster sugar
  • 65ml water
  • 180g almond meal
  • 180g pure icing sugar
  • brown food colouring

Caramel buttercream:

  • 300g sugar
  • 300ml cream
  • 260g butter
  • pinch of salt

Decorating:

  • 100g white chocolate, tempered
  • 50 mini chocolate chips
  • black candy write (or tempered dark chocolate)

Instructions:

Macaron shells:

  1. Preheat the oven to 130ºC fan forced
  2. place two egg whites into a stand mixer
  3. heat the caster sugar and water over low heat to make a sugar syrup
  4. once the sugar has all dissolved, turn on the stand mixer to medium speed to whisk the egg whites
  5. when the sugar syrup reaches 120ºC remove from heat and pour in a slow steady stream down the side of the stand mixer, with the mixer still running at medium speed
  6. increase the speed to high and whisk for 1 minute and then back to medium for another 5 minutes until the meringue forms stiff peaks
  7. meanwhile, sift the pure icing sugar and almond meal into a clean bowl
  8. pour the remaining two egg whites into the almond/sugar mixture. Add 4 drops of brown food colour gel and mix together with a spatula
  9. fold in 1/3 of the meringue and mix thoroughly with the spatula
  10. gently fold in the remainder of the meringue. Keep folding until the batter has the consistency of molten lava
  11. place ~90% of the mixture into a piping bag fitted with a plain round tip and pipe circles around 3cm in diameter
  12. place the remaining mixture into another piping bag fitted with a smaller round tip. Use this to pipe the bear ears on half the macaron shells
  13. let the piped shells rest for 20 minutes until a skin forms over the macarons
  14. bake one tray at a time for 13 minutes

caramel buttercream:

  1. place the sugar into a saucepan and melt over low heat
  2. meanwhile, place the cream in a separate saucepan over low heat
  3. once the sugar has turned to a dark amber colour, remove from heat and melt 60g of butter into the sugar
  4. At this stage the cream should have come to a boil. Pour the boiling cream into the sugar, stirring with a wooden spoon
  5. return the saucepan to low heat and stir until it forms a smooth caramel
  6. stir in a pinch of salt then set aside to cool
  7. once the caramel has come to room temperature, whisk together with the remaining 200g of butter to form a buttercream
img_3363
macaron shells just out of the oven – half have teddy bear ears which will be the top shell of the macarons

Decorating the macarons:

  1. pair the macaron shells so that you can place one teddy bear shell over a plain round shell of similar size
  2. on each of the teddy bear faces, spoon a small amount of tempered white chocolate to form the nose/mouth area of the bear
  3. place a mini chocolate chip over the white chocolate to resemble a nose
  4. draw two eyes on each teddy face with a black candy writer
img_3370
pipe or spoon tempered white chocolate on the shells with ears
teddy-bear-macarons-recipe
completed teddy bear macarons
img_9589-1
Buzzing bee and teddy macarons
img_7398
Pink teddy bear macarons for a 1st birthday party


Instagram: Whatever_It_Bakes

Recipe: Christmas Croquembouche

Christmas croquembouche baking recipe

Makes: 80-100 profiteroles, serves 15 – 30 people

Time required: 3 hours for the choux pastry, another 2 hours for filling and assembly

Difficulty: ★★★★☆ … Moderate to Difficult. Each step is relatively simple, however it takes time and patience to bring the whole thing together

Challenge:

After baking four cakes for Christmas dinner last year, I needed to bake something bigger and better for Christmas this year. However, an added challenge this year is that I am now living in Hong Kong and will only have one day to bake Christmas dessert once I arrive back home in Melbourne on Christmas Eve. This means I need something that can be baked in less than one day, can feed a family of 9 and also satisfies the requests I usually get from family: coffee, coconut, sweet, not too sweet … and of course it needs to have a touch of Christmas.

Enter croquembouche: makes ~80-100 profiteroles and can feed 15-30 people, it can be decorated to resemble a Christmas tree and you can make a range of fillings to meet every request … AND they look SPECTACULAR.

Inspiration:

I first saw croquembouche as an Adriano Zumbo challenge on Masterchef Australia several years ago. Touted as a very difficult challenge on Masterchef, I never even thought about making a croquembouche until several weeks ago when I was desperately thinking up Christmas ideas.

Having never baked profiteroles before, I read several blogs, watched a range of youtube videos and viewed countless Instagram photos in search of inspiration for decorating to make it fit the Christmas theme.

I decided to use my eclair recipe for the choux pastry. As for decorating, I went for a ‘cleaner’ croquembouche without the caramel strings and added pops of texture by coating some profiteroles in coconut or crushed peanuts. I also found some lovely ribbon at the Eslite Bookstore in Hong Kong to top off the croquembouche.

This post details my ‘practice’ croquembouche … I will be making the real one on Christmas Eve and will upload an update post-Christmas 🙂

Ingredients:

Choux Pastry (makes ~100 profiteroles):

  • 310g bread flour, sifted
  • 250ml water
  • 250ml milk
  • 250g butter
  • 30g caster sugar
  • 8-10 eggs
  • 2tsp salt

Custard filling:

  • 950ml milk
  • 8 egg yolks
  • 120g caster sugar
  • 80g corn starch
  • 30g unsalted butter
  • 2tsp vanilla bean paste

For decorating:

  • 500g sugar to assemble the croquembouche
  • 200g crushed peanuts
  • 100g shredded coconut

Note: you could also use sugar crystals, pearls or anything else you would like to decorate the individual profiteroles

Instructions:

Choux pastry:

  1. Preheat oven to 200°C
  2. Place the water, milk, butter, sugar and salt into a saucepan over low heat
  3. Once the mixture just comes to a boil, take off the heat, pour in all the flour and mix thoroughly with a wooden spoon (it should now look like mashed potato)
  4. Place the mixture back on low heat and continue to mix for another 2-3mins until the dough forms a ball and comes away from the sides of the pan
  5. Pour the dough into a bowl and mix with wooden spoon to cool slightly before adding the eggs
  6. Add the eggs one at a time and ensure each egg is well incorporated before adding the next egg. This allows greater control over the amount of egg to ensure the mixture doesn’t become too runny from too much egg
  7. The mixture is ready when you lift the wooden spoon and the dough slowly falls off the spoon
  8. Place dough into a piping bag fitted with a 1cm plain round nozzle and pipe balls around 2-2.5cm in diameter
  9. Dip a fork into water and slightly flatten the piped circles. The fork indents also reduce cracking in the oven
  10. Bake for 10mins at 200°C and then reduce the temperature to 180°C and bake for another 20mins

Custard filling:

  1. Whisk together egg yolks and sugar until pale
  2. Add in the cornstarch and whisk
  3. Place milk over low-med heat until it comes to a light boil
  4. Remove milk from heat and pour 1/3 of the milk into the egg mixture while continually whisking
  5. Pour the egg mixture into the remaining 2/3 of the milk and place back on low heat. Continue to whisk until the custard thickens
  6. Stir in butter and vanilla
  7. Transfer this to a bowl to cool – at this stage you could also break the custard into smaller batches and create several flavours by whisking in melted dark chocolate, fruit puree or coffee syrup
  8. Cover in glad wrap (with the glad wrap touching the surface of the custard) and refrigerate until it’s time to assemble the croquembouche.

Assembling the croquembouche:

  1. Transfer the custard into a piping bag fitted with a long piping tip and fill each profiterole with custard. Be sure to poke the piping tip through the side of the profiterole which will be facing the inside of the croquembouche
  2. Melt sugar over low heat until all the sugar is melted and is a light amber colour (you could also make a sugar syrup by adding water). Carefully dip the bottom of each profiterole and place the toffee side up on the tray to dry – at this stage I also coated around half of the profiteroles with either shredded coconut or crushed peanuts
  3.  Trace a circle template on a sheet of baking paper
  4. Construct the croquembouche by carefully lining the profiteroles around the circle; sticking each profiterole together using the toffee ‘glue’
img_3402
The finished product!!

Tips for serving:

  • The profiteroles can be cut away from the tower using a pair of scissors
  • I also pulled together a bowl of dark chocolate ganache (150g dark chocolate, 100ml cream) for guests to dip the profiteroles into while serving
img_3408
Cut the croquembouche with scissors


Instagram: Whatever_It_Bakes