Recipe: Teddy bear macarons

Teddy bear macarons recipe

Makes: 50 macarons

Time required: 3 hours

Difficulty: ★★★☆☆

Challenge:

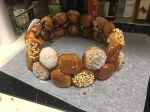
When I was asked to bake macarons for a baby shower, my first question was “boy or girl?” I was trying to figure out if I should make blue blueberry macarons or raspberry red macarons … however turns out the sex of this baby was a surprise so I had to come up with something gender neutral. This is where the brown teddy bear macarons come in!

Ingredients:

Macaron shells:

  • 4 egg whites
  • 180g caster sugar
  • 65ml water
  • 180g almond meal
  • 180g pure icing sugar
  • brown food colouring

Caramel buttercream:

  • 300g sugar
  • 300ml cream
  • 260g butter
  • pinch of salt

Decorating:

  • 100g white chocolate, tempered
  • 50 mini chocolate chips
  • black candy write (or tempered dark chocolate)

Instructions:

Macaron shells:

  1. Preheat the oven to 130ºC fan forced
  2. place two egg whites into a stand mixer
  3. heat the caster sugar and water over low heat to make a sugar syrup
  4. once the sugar has all dissolved, turn on the stand mixer to medium speed to whisk the egg whites
  5. when the sugar syrup reaches 120ºC remove from heat and pour in a slow steady stream down the side of the stand mixer, with the mixer still running at medium speed
  6. increase the speed to high and whisk for 1 minute and then back to medium for another 5 minutes until the meringue forms stiff peaks
  7. meanwhile, sift the pure icing sugar and almond meal into a clean bowl
  8. pour the remaining two egg whites into the almond/sugar mixture. Add 4 drops of brown food colour gel and mix together with a spatula
  9. fold in 1/3 of the meringue and mix thoroughly with the spatula
  10. gently fold in the remainder of the meringue. Keep folding until the batter has the consistency of molten lava
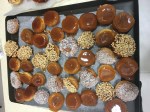
  11. place ~90% of the mixture into a piping bag fitted with a plain round tip and pipe circles around 3cm in diameter
  12. place the remaining mixture into another piping bag fitted with a smaller round tip. Use this to pipe the bear ears on half the macaron shells
  13. let the piped shells rest for 20 minutes until a skin forms over the macarons
  14. bake one tray at a time for 13 minutes

caramel buttercream:

  1. place the sugar into a saucepan and melt over low heat
  2. meanwhile, place the cream in a separate saucepan over low heat
  3. once the sugar has turned to a dark amber colour, remove from heat and melt 60g of butter into the sugar
  4. At this stage the cream should have come to a boil. Pour the boiling cream into the sugar, stirring with a wooden spoon
  5. return the saucepan to low heat and stir until it forms a smooth caramel
  6. stir in a pinch of salt then set aside to cool
  7. once the caramel has come to room temperature, whisk together with the remaining 200g of butter to form a buttercream
img_3363
macaron shells just out of the oven – half have teddy bear ears which will be the top shell of the macarons

Decorating the macarons:

  1. pair the macaron shells so that you can place one teddy bear shell over a plain round shell of similar size
  2. on each of the teddy bear faces, spoon a small amount of tempered white chocolate to form the nose/mouth area of the bear
  3. place a mini chocolate chip over the white chocolate to resemble a nose
  4. draw two eyes on each teddy face with a black candy writer
img_3370
pipe or spoon tempered white chocolate on the shells with ears
teddy-bear-macarons-recipe
completed teddy bear macarons
img_9589-1
Buzzing bee and teddy macarons
img_7398
Pink teddy bear macarons for a 1st birthday party


Instagram: Whatever_It_Bakes

Recipe: Passionfruit & Meringue Eclairs

passionfruit chocolate meringue eclair recipe

Makes: 15 eclairs

Time required: 2 hours

Difficulty: ★★☆☆☆

Inspiration:

Since moving to Hong Kong in February this year, I have been baking using a portable oven (besides my trips back to Melbourne). For those of you who haven’t lived in Hong Kong before … the apartments are small and most apartments have tiny kitchens without ovens. Although this portable oven (around the size of an Australian microwave) is great for cooking and basic cakes, the temperature isn’t very even or reliable so I haven’t been brave enough to try baking macarons in Hong Kong. But I am dying to bake some sort of pastry … so I decided to try a choux pastry!

My favourite eclairs are the salted caramel ones from Chez Dre in Melbourne and the world-famous eclairs from Sadaharu Aoki in Tokyo. Having no prior concept of what makes choux pastry puff, I’ve always marvelled at how patisseries manage to fill the eclair with custard without cutting the eclair open. Turns out it’s quite simple! 🙂

img_0848
My portable oven in Hong Kong – great for basic baking but I haven’t been brave enough to test macarons in this

Ingredients:

Passionfruit custard:

  • 200g passionfruit, seeds removed
  • 350ml milk
  • 2tsp vanilla been paste
  • 4 egg yolks
  • 100g caster sugar
  • 50g cornstarch
  • 20g unsalted butter

Choux pastry:

  • 125g bread flour, sifted
  • 100ml milk
  • 100ml water
  • 10g sugar
  • 1tsp salt
  • 100g unsalted butter
  • 4 eggs

Chocolate ganache:

  • 200g chocolate
  • 150ml cream

Meringue:

  • 2 egg whites
  • 180g caster sugar
  • 65ml water

Instructions:

Passionfruit custard:

  1. whisk sugar and egg yolks until pale.
  2. whisk in the cornstarch
  3. heat milk and passionfruit over low-med heat until simmering
  4. pour 1/3 of the milk/passionfruit into the egg yolk mixture whilst whisking, then pour the entire mixture back into the rest of the milk/passionfruit
  5. place back on low heat, stirring constantly until the custard thickens
  6. remove from heat and stir in the vanilla paste and butter
  7. cover in glad wrap with the glad wrap touching the surface and set aside to chill in the fridge while making the eclair shells

Choux pastry

  1. Preheat oven to 200°C
  2. Place the water, milk, butter, sugar and salt into a saucepan over low heat
  3. Once the mixture just comes to a boil, take off the heat, pour in all the flour and mix thoroughly with a wooden spoon (it should now look like mashed potato)
  4. Place the mixture back on low heat and continue to mix for another 2-3mins until the dough forms a ball and comes away from the sides of the pan
  5. Pour the dough into a bowl and mix with wooden spoon to cool slightly before adding the eggs
  6. Add the eggs one at a time and ensure each egg is well incorporated before adding the next egg. This allows greater control over the amount of egg to ensure the mixture doesn’t become too runny from too much egg
  7. The mixture is ready when you lift the wooden spoon and the dough slowly falls off the spoon
  8. Place dough into a piping bag fitted with a 1cm star nozzle lines around 10-12cm long. Be sure to leave enough space between for the eclairs to expand in the oven
  9. Bake for 10mins at 200°C and then reduce the temperature to 180°C and bake for another 20mins
  10. once removed from the oven, use a toothpick to poke a whole through each meringue to let the steam out. This prevents the eclair shell from becoming soggy or sinking
  11. set aside to completely cool before adding in the custard
img_2834
Piped choux pastry ready to go into the oven
img_2835
Choux pastry puffing up in the oven

Chocolate ganache:

  1. Bring cream to boil and pour over dark chocolate. Set aside for 2 minutes
  2. Mix in the melted chocolate with the cream
  3. stir in the butter, and set aside to cool slightly

Assembling the eclairs:

  1. once the shells have completely cooled, poked three holes evenly spaced along the top of the eclair
  2. place the custard into a piping bag fitted with a long narrow tip and fill each eclair with custard through the three holes
  3. coat the top of the eclair in chocolate ganache using a spatula

Many blogs tell you to poke the holes and fill the eclairs from the botton of the eclair shell however I prefer to pipe it through the top so I can cover up the holes with ganache.

img_2844
Eclairs coated in chocolate ganache

Meringue:

  1. whisk egg whites until foamy
  2. heat sugar and water over low-med heat until the syrup reaches 120ºC
  3. while whisking the eggs, pour the sugar syrup in a thin stream down the side of the whisking bowl
  4. continue to whisk the eggs until it form stiff peaks
  5. place the meringue into a piping bag fitted with a petal tip and pipe the meringue onto the eclairs. you could also use other piping tips to create other patterns
OLYMPUS DIGITAL CAMERA
Carefully piping the meringue onto the eclairs
img_2843
nom nom … all that delicious meringue
OLYMPUS DIGITAL CAMERA
torching the meringue

To finish … torch the meringue and decorate the eclairs with raspberries and mint leaves 🙂

OLYMPUS DIGITAL CAMERA
Finished eclairs!! Photo: IG __Salpal__
OLYMPUS DIGITAL CAMERA
ready to be eaten … so delicious :p … Photo: IG __Salpal__


Instagram: Whatever_It_Bakes

Ideas: Christmas baking – macarons and cakes

Christmas baking: reindeer macarons

Christmas is always an exciting time of year … work is quieter … people are in ‘holiday mode’ … the weather in Melbourne is lovely … AND I have more excuses to bake (and plenty of time to bake since the footy isn’t on).

Leading up to Christmas the past two years, I’ve baked for family dinners as well as charity fundraisers which both present their own challenges. This post showcases the cakes I baked for Christmas dinner in 2015 and as well as the macarons baked for a fundraiser leading up to Christmas in 2014.

For Christmas 2016 … check out the posts on my Gingerbread House and Croquembouche journeys.

Christmas themed macarons:

I really enjoy baking macarons and will find an excuse to bake more macarons whether it’s for a wedding, Christmas, Easter or just any party. Here’s my selection of Christmas macarons for a Christmas charity fundraiser:

  1. Christmas pudding macarons: decorated with tempered white chocolate
  2. Christmas coloured macarons: raspberry and matcha flavoured
  3. Reindeer macarons: red m&m’s for the nose and pretzel antlers

Christmas cakes:

Being in charge of dessert for my family’s Christmas dinner is always a challenge – trying to keep all 9 people happy which includes: my parents who don’t like anything too sweet, my sister who always requests something coffee flavoured and a brother-in-law who wants nothing but a tart (more specifically … the Strawberry and Berry Tart from Le Petit Gateau in Melbourne).

Given these requirements, I came up with the following desserts:

  1. Opera cake: to meet the request of a coffee flavoured dessert
  2. Matcha mousse cake: something not too sweet for the parents
  3. Raspberry & passionfruit tart: not quite the same as the tart from Le Petit Gateau, but still a tart with berries
  4. Mango Cheesecake: At this stage I may as well keep baking and use up everything I have in the fridge
img_9987
All the cakes after four nights of baking

Opera cake:

A decadent cake made from layers of almond sponge soaked in coffee liquor syrup, chocolate ganache and coffee buttercream – this cake is always one of my favourites to bake (recipe to be posted soon).

img_9926
Opera cake – one of my favourite cakes to bake and always a crowd pleaser

Matcha Mousse cake:

Following the matcha trend – I decided to bake a matcha and white chocolate mousse cake for my ‘not too sweet’ dessert. Sitting on top of the matcha almond sponge is a layer of white chocolate mousse which adds a hint of sweetness to the bitter matcha cake.

img_9964
Matcha Mousse cake

Raspberry and Passionfruit tart:

Although the tarts from Le Petit Gateau look amazing, I opted for a more ‘traditional’ tart … baked in a tart pan with plenty of custard and topped with fruit. I made a passionfruit curd to add a bit more flavour to the custard and topped the tart with raspberries, raspberry jam and chopped pistachios. Not quite Le Petit Gateau standard … but still relatively happy with the finished product given it was my first tart or pastry crust attempt.

img_9963
Raspberry & passionfruit tart

Mango Cheesecake:

I wasn’t joking earlier when I said that I was using up the ingredients in my fridge. We had several ripe mangos in the house and cream cheese in the fridge. The bright colour of the mango also looked great with the red/green/brown of the other cakes.

This was a very simple cheesecake to make, comprised of a Arnott’s Nice biscuit base, vanilla cheesecake (recipe to be posted soon) and a mango jelly.

img_9903
Mango cheesecake

I’m always looking for new ideas and challenges for Christmas themed baking, so if you have any great posts or recipes, please share below 🙂


Instagram: Whatever_It_Bakes

Recipe: Passionfruit & Chocolate Tart

passionfruit chocolate meringue tart cake recipe

Makes: 12 mini dome cakes (6cm in diameter)

Time required: 3 hours in total, over 2-3 nights

Difficulty: ★★★☆☆

Inspiration:

The flavours for this cake were inspired by Koko Black’s ‘Passion’ chocolate – bitter, sour and sweet all in one small chocolate. I first tried this passionfruit & chocolate blend four years ago in Melbourne and it is still my favourite flavour combination.

The inspiration for the meringue coating is from my favourite cocktail – the Lavendar Meringue pie from Hong Kong’s Quinary Bar. Although the cocktail itself is very lemon-y, the richness of the meringue with each sip of your cocktail provides a great balance of sweet & sour.

Ingredients:

Chocolate ganache:

  • 150g dark chocolate
  • 100ml cream
  • 10g butter

Passionfruit dome:

  • 200g passionfruit, seeds removed
  • 100g sugar
  • 1 gelatin leaf
  • 175ml cream, whipped

Shortbread crust:

  • 225g butter
  • 100g sugar
  • 350g flour

Meringue:

  • 2 egg whites
  • 180g caster sugar
  • 60ml water

Instructions:

Chocolate ganache:

  1. Bring cream to boil and pour over dark chocolate. Set aside for 2 minutes
  2. Mix in the melted chocolate with the cream
  3. stir in the butter, and set aside to cool while making the passionfruit dome

Passionfruit dome:

  1. Place sugar and passionfruit over low-medium heat until all the sugar has dissolved and the passionfruit slightly thickens
  2. stir in the bloomed gelatin sheet and set aside to cool
  3. once the mixture is at room temperature, gently fold in whipped cream
  4. pour the passionfruit mousse into dome moulds (around 6cm in diameter), leaving a little space for a the chocolate ganache
  5. pipe in around 2tsbp of chocolate ganache. Alternatively, if you have more time to make these cakes you could freeze the chocolate ganache the night before and cut out circles to place into the passionfruit mousse
  6. place the domes into a freezer for at least 3 hours (preferably overnight) to harden

Shortbread crust:

  1. Preheat oven to 160ºC fan forced
  2. cream the butter and sugar in a bowl
  3. add in the flour and mix well with a wooden spoon until a dough has formed
  4. roll out the dough and slice it into 8cm discs. We want the shortbread crust to be at least 1cm wider than the passionfruit dome to be able to hold the meringue
  5. bake for 8 minutes until golden

Meringue:

  1. whisk egg whites until foamy
  2. heat sugar and water over low-med heat until the syrup reaches 120ºC
  3. while whisking the eggs, pour the sugar syrup in a thin stream down the side of the whisking bowl
  4. continue to whisk the eggs until it form stiff peaks

Assembling the cake:

  1. remove the passionfruit mousse dome from the freezer and un-mould the domes
  2. place one dome over each disc of shortbread crust
  3. cover the dome in meringue using a spatula (you could also pipe the meringue in flowers or spikes) and torch until golden brown

I also topped off my cakes with mini candy flowers chocolate decorations

img_1638
the finished cake – showing the passionfruit and chocolate encased in meringue
img_1665
another photo of the finished passionfruit & chocolate tart


Instagram: Whatever_It_Bakes

Recipe: Christmas Gingerbread House

Christmas gingerbread house baking recipe

Makes: 1 gingerbread house

Time required: 1.5 days … in 2-3 hour blocks

Difficulty: ★★★☆☆ …  – gingerbread itself is very simple … the more stressful parts are designing the template and waiting for the icing to set to hold the house together.

Inspiration:

Growing up, my childhood dream was to become an architect. I’ve always had an interest in buildings and construction (having studied Civil Engineering), so baking a gingerbread house was a very exciting Christmas project for me.

The inspiration for this gingerbread house? The French Provincial houses of the leafy Eastern suburbs of Canterbury and Kew in back home in Melbourne – featuring symmetrical proportions, steep roofs and a balcony. The Civil Engineering degree definitely came in handy when designing the house and roof dimensions and building a cardboard template.

img_3200
Cardboard template

Ingredients:

Gingerbread (for a house ~ W30cm, H20cm, D20cm in size):

  • 500g butter
  • 400g dark muscovado sugar
  • 10tsp golden syrup
  • 1.2kg plain flour
  • 4tsp bicarbonate soda
  • 10g ground ginger
  • 10g cinnamon powder

Royal Icing (made in 4 smaller batches):

  • 4 egg whites
  • 1kg pure icing sugar

To decorate – free to use whatever candy you can find, however this is what I chose:

  • maltesers as the rocks lining the side of the footpath
  • pastille lollies for the ’tiled’ footpath
  • rice paper sheets for the windows
  • marshmallow snowman
  • pocky sticks for the snowman arms
  • sour strap candy for the garage door and Christmas tree stars
  • almond flakes to line the ‘stone’ porch
  • preztels for the balconies and driveway
  • m&m Christmas lights
  • chocolate wafer roof
  • plain wafers for the corner detailing

Instructions:

Gingerbread:

  1. Preheat oven to 200°C
  2. Melt butter, sugar and golden syrup over low heat until all the butter has melted
  3. Sift the flour, bicarbonate soda, cinnamon and ginger in a separate bowl
  4. Stir melted butter into flour mixture to make a stiff dough
  5. Divide the dough into 3-4 smaller batches and roll out to 1cm thickness
  6. Tracing the cardboard template made earlier, cut out each piece of gingerbread
  7. Cook in oven for 12 minutes until the edges start to brown
  8. Remove from oven and allow to cool/dry to harden
img_3218
all the baked gingerbread pieces

Royal icing:

  1. Stir together egg whites and pure icing sugar until the mixture becomes a smooth icing
  2. Place the icing sugar into a piping bag fitted with a small round nozzle and pipe along the edges of the gingerbread (one piece at a time) to join the house together. Ensure the walls of the house are completely dry before placing the roof on top of the house
img_3220
gluing the pieces together with icing sugar
img_3222
gingerbread house coming together

Decorate:

  1. Use royal icing (resembling snow) to cover up the ‘messy’ corners and joints on the house
  2. Also use royal icing to stick candy decorations to the house
img_3224
piping ‘snow’ to cover up the joints and corners
img_3292
Front of the house all decorated
img_3242
back of the house

Party time:

Whilst I had so much fun baking, building and decorating the house …. the most exciting part is definitely showing off your house to friends and then demolishing and eating the house.

img_3405
time to show off the house
IMG_3380.JPG
enjoying the lovely view of Hong Kong
img_3383
demolished

I’ll admit that I was a little sad to tear the house apart, however we did enjoy snacking away at the gingerbread house on a lovely Saturday afternoon in the sun.

I’m already looking forward to designing and baking another gingerbread house next year! 🙂


Instagram: Whatever_It_Bakes

Recipe: Christmas Croquembouche

Christmas croquembouche baking recipe

Makes: 80-100 profiteroles, serves 15 – 30 people

Time required: 3 hours for the choux pastry, another 2 hours for filling and assembly

Difficulty: ★★★★☆ … Moderate to Difficult. Each step is relatively simple, however it takes time and patience to bring the whole thing together

Challenge:

After baking four cakes for Christmas dinner last year, I needed to bake something bigger and better for Christmas this year. However, an added challenge this year is that I am now living in Hong Kong and will only have one day to bake Christmas dessert once I arrive back home in Melbourne on Christmas Eve. This means I need something that can be baked in less than one day, can feed a family of 9 and also satisfies the requests I usually get from family: coffee, coconut, sweet, not too sweet … and of course it needs to have a touch of Christmas.

Enter croquembouche: makes ~80-100 profiteroles and can feed 15-30 people, it can be decorated to resemble a Christmas tree and you can make a range of fillings to meet every request … AND they look SPECTACULAR.

Inspiration:

I first saw croquembouche as an Adriano Zumbo challenge on Masterchef Australia several years ago. Touted as a very difficult challenge on Masterchef, I never even thought about making a croquembouche until several weeks ago when I was desperately thinking up Christmas ideas.

Having never baked profiteroles before, I read several blogs, watched a range of youtube videos and viewed countless Instagram photos in search of inspiration for decorating to make it fit the Christmas theme.

I decided to use my eclair recipe for the choux pastry. As for decorating, I went for a ‘cleaner’ croquembouche without the caramel strings and added pops of texture by coating some profiteroles in coconut or crushed peanuts. I also found some lovely ribbon at the Eslite Bookstore in Hong Kong to top off the croquembouche.

This post details my ‘practice’ croquembouche … I will be making the real one on Christmas Eve and will upload an update post-Christmas 🙂

Ingredients:

Choux Pastry (makes ~100 profiteroles):

  • 310g bread flour, sifted
  • 250ml water
  • 250ml milk
  • 250g butter
  • 30g caster sugar
  • 8-10 eggs
  • 2tsp salt

Custard filling:

  • 950ml milk
  • 8 egg yolks
  • 120g caster sugar
  • 80g corn starch
  • 30g unsalted butter
  • 2tsp vanilla bean paste

For decorating:

  • 500g sugar to assemble the croquembouche
  • 200g crushed peanuts
  • 100g shredded coconut

Note: you could also use sugar crystals, pearls or anything else you would like to decorate the individual profiteroles

Instructions:

Choux pastry:

  1. Preheat oven to 200°C
  2. Place the water, milk, butter, sugar and salt into a saucepan over low heat
  3. Once the mixture just comes to a boil, take off the heat, pour in all the flour and mix thoroughly with a wooden spoon (it should now look like mashed potato)
  4. Place the mixture back on low heat and continue to mix for another 2-3mins until the dough forms a ball and comes away from the sides of the pan
  5. Pour the dough into a bowl and mix with wooden spoon to cool slightly before adding the eggs
  6. Add the eggs one at a time and ensure each egg is well incorporated before adding the next egg. This allows greater control over the amount of egg to ensure the mixture doesn’t become too runny from too much egg
  7. The mixture is ready when you lift the wooden spoon and the dough slowly falls off the spoon
  8. Place dough into a piping bag fitted with a 1cm plain round nozzle and pipe balls around 2-2.5cm in diameter
  9. Dip a fork into water and slightly flatten the piped circles. The fork indents also reduce cracking in the oven
  10. Bake for 10mins at 200°C and then reduce the temperature to 180°C and bake for another 20mins

Custard filling:

  1. Whisk together egg yolks and sugar until pale
  2. Add in the cornstarch and whisk
  3. Place milk over low-med heat until it comes to a light boil
  4. Remove milk from heat and pour 1/3 of the milk into the egg mixture while continually whisking
  5. Pour the egg mixture into the remaining 2/3 of the milk and place back on low heat. Continue to whisk until the custard thickens
  6. Stir in butter and vanilla
  7. Transfer this to a bowl to cool – at this stage you could also break the custard into smaller batches and create several flavours by whisking in melted dark chocolate, fruit puree or coffee syrup
  8. Cover in glad wrap (with the glad wrap touching the surface of the custard) and refrigerate until it’s time to assemble the croquembouche.

Assembling the croquembouche:

  1. Transfer the custard into a piping bag fitted with a long piping tip and fill each profiterole with custard. Be sure to poke the piping tip through the side of the profiterole which will be facing the inside of the croquembouche
  2. Melt sugar over low heat until all the sugar is melted and is a light amber colour (you could also make a sugar syrup by adding water). Carefully dip the bottom of each profiterole and place the toffee side up on the tray to dry – at this stage I also coated around half of the profiteroles with either shredded coconut or crushed peanuts
  3.  Trace a circle template on a sheet of baking paper
  4. Construct the croquembouche by carefully lining the profiteroles around the circle; sticking each profiterole together using the toffee ‘glue’
img_3402
The finished product!!

Tips for serving:

  • The profiteroles can be cut away from the tower using a pair of scissors
  • I also pulled together a bowl of dark chocolate ganache (150g dark chocolate, 100ml cream) for guests to dip the profiteroles into while serving
img_3408
Cut the croquembouche with scissors


Instagram: Whatever_It_Bakes